There are desserts that make you pause mid-bite, close your eyes, and think, this is what comfort tastes like. For me, cherry cobbler is that dessert. It’s not flashy like a triple-layer cake or as delicate as crème brûlée, but it has its own magic—a mix of sweet-tart fruit tucked under a golden, buttery crust that makes you want to sneak back for seconds.
If you’ve ever wondered how to make a cherry cobbler that turns out just right every single time, you’re in the right place. Let’s dive in together, and by the end of this guide, you’ll have the know-how to whip one up with confidence.
The Heart of a Cherry Cobbler
A cobbler isn’t a pie, and it’s not quite a crisp either. Think of it as the best of both worlds. The filling is juicy fruit, bubbling with flavor, while the topping is somewhere between a biscuit and a cake—soft, golden, and just sturdy enough to cradle that fruit beneath it.
Cherry cobbler, specifically, hits a special note. Cherries bring that tangy-sweet balance that keeps a dessert from being cloying. You know how a pie can sometimes feel too heavy or sweet? The cherry cobbler keeps things lively with brightness and zing.
The beauty here is that it doesn’t take hours to make. From start to finish, you can have a cherry cobbler on the table in just about an hour. And most of that time, the oven does the work for you.
Why Cherry Cobbler Deserves a Spot in Your Recipe Box
Let me be real with you: I didn’t grow up with cobblers. My family was more into rice puddings and semolina sweets. But the first time I had cherry cobbler at a friend’s summer cookout, I instantly knew it was a keeper. Here’s why:

- It’s forgiving. Unlike pies, you don’t need to fuss with rolling out dough or chilling crusts.
- It scales easily. Whether you’re making dessert for two or a crowd, cobbler adjusts without drama.
- It’s versatile. Sweet cherries, tart cherries, frozen or fresh—you can make it work.
- It’s nostalgic. Cobbler carries that rustic, “Grandma’s kitchen” vibe, even if you’ve never had one before.
And here’s a fun stat: according to the USDA, Americans consume nearly 1.5 pounds of cherries per person each year. While most of those are eaten fresh, desserts like cobbler play a big role in cherry demand, especially when harvest peaks in the summer.
Choosing the Right Cherries
Here’s the first fork in the road: sweet cherries or tart cherries?
- Sweet Cherries (Bing, Rainier): These are the ones you’re likely snacking on in the summer. They’re juicy and sweet, perfect if you prefer a less tangy cobbler.
- Tart Cherries (Montmorency, Morello): These are the darlings of baking. Their natural acidity cuts through sugar, giving desserts that addictive, lip-smacking edge.
If you’ve ever had cherry pie, chances are it was made with tart cherries. But don’t stress—you can use frozen cherries too. Frozen fruit is picked at peak ripeness, so it often delivers consistent flavor, and it saves you the headache of pitting pounds of cherries.

Here’s my advice:
- If using fresh cherries, aim for about 6 cups (roughly 2 pounds), pitted.
- If using frozen cherries, thaw and drain excess liquid so your cobbler doesn’t turn soupy.
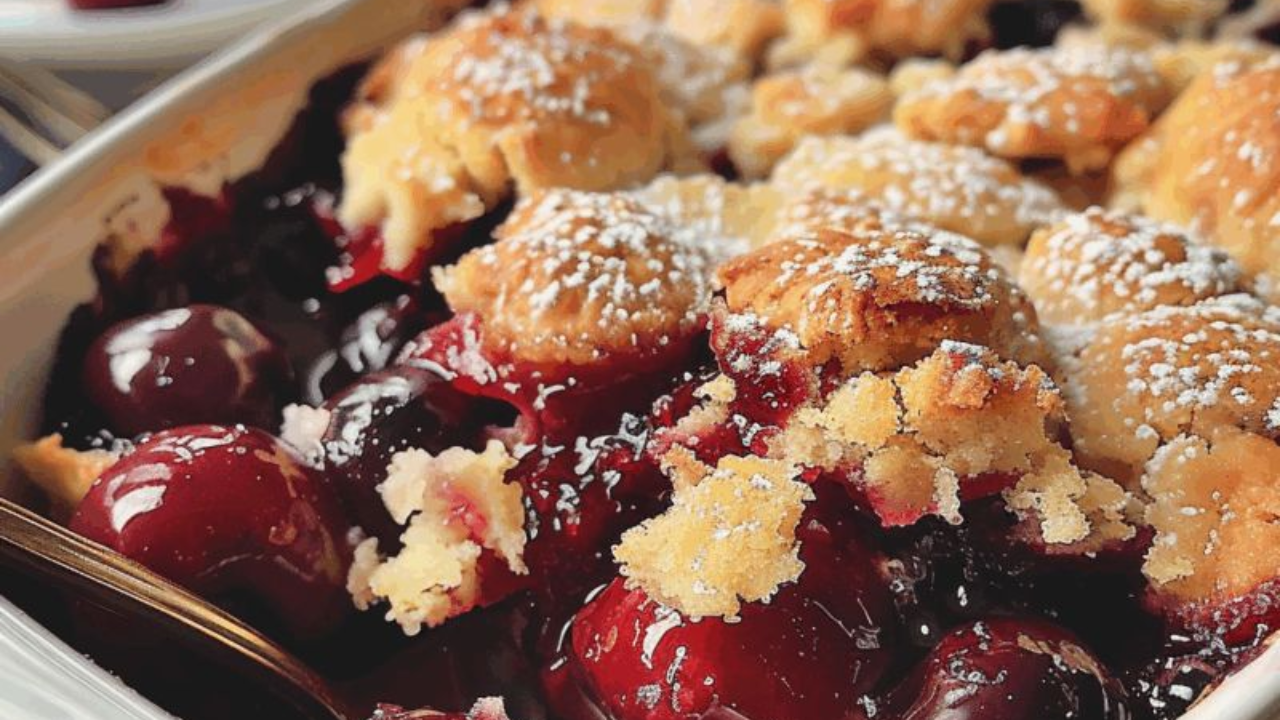
The Anatomy of the Perfect Cobbler Topping
The topping is what separates cobbler from other fruit desserts. Some people lean biscuit-like, others prefer a softer, cake-like topping. The key lies in the ratio of flour, fat, sugar, and liquid.
- Flour: All-purpose flour is standard. It creates structure without being too heavy.
- Fat: Butter is non-negotiable. It gives flavor, richness, and that golden finish.
- Sugar: A little in the topping balances the tartness of the cherries.
- Liquid: Milk or cream binds it together, giving that tender crumb.
Personally, I prefer a slightly cakier topping—it soaks up the cherry juices without becoming soggy. Think of it like dipping a fluffy biscuit into a pool of cherry goodness.
Pro tip: sprinkle a bit of coarse sugar on top before baking. It gives you that bakery-style crunch when you bite in.
Step-by-Step: How to Make a Cherry Cobbler
Here’s the moment you’ve been waiting for—the detailed, foolproof method.
Ingredients
For the filling:
- 6 cups cherries (fresh or frozen, pitted)
- ¾ cup granulated sugar (adjust depending on cherry sweetness)
- 2 tablespoons cornstarch
- 1 teaspoon vanilla extract
- ½ teaspoon almond extract (optional, but magical with cherries)
- Pinch of salt
For the topping:
- 1 cup all-purpose flour
- ½ cup granulated sugar
- 1 ½ teaspoons baking powder
- ¼ teaspoon salt
- ½ cup unsalted butter, melted
- ½ cup milk or heavy cream
- 1 tablespoon coarse sugar (for sprinkling)
Directions
- Preheat the oven to 375°F (190°C).
- Make the filling. In a large bowl, toss cherries with sugar, cornstarch, vanilla, almond extract, and salt. Spread evenly in a greased 9×13 baking dish.
- Mix the topping. In another bowl, whisk flour, sugar, baking powder, and salt. Stir in melted butter and milk until just combined (don’t overmix).
- Assemble. Drop spoonfuls of the batter over the cherries. It won’t cover completely—that’s okay, the batter spreads as it bakes. Sprinkle coarse sugar on top.
- Bake for 35–40 minutes, until the topping is golden brown and the cherry filling is bubbling.
- Cool slightly. Let it rest for 10 minutes before serving.
Tips to Elevate Your Cherry Cobbler

- Balance sweetness. Taste your cherries first. If they’re extra sweet, cut back on sugar. If they’re tart, add a little more.
- Thicken wisely. Cornstarch works best here, but don’t skip it—otherwise, you’ll end up with cherry soup.
- Flavor boosters. A splash of bourbon or brandy in the filling adds depth. Cinnamon or nutmeg in the topping can add warmth.
- Bake until bubbly. The filling should bubble around the edges; that’s how you know the cornstarch has thickened.
Serving Ideas That Make It Shine
Cobbler is great warm, straight from the oven, but let’s be real—it goes from great to unforgettable when you pair it with the right sidekick.

- Classic vanilla ice cream: The hot-cold contrast is unbeatable.
- Whipped cream: Simple, airy, and balances the richness.
- Greek yogurt: If you want to pretend you’re being healthy, this works shockingly well.
At a summer cookout, I once brought a cherry cobbler still warm from the oven, with a tub of ice cream. Within 15 minutes, the pan was scraped clean. Someone even licked the spoon (no shame). That’s the power of a good cobbler.
Storing and Reheating
Cherry cobbler is best enjoyed the day it’s made, but leftovers do keep.
- Room temperature: Up to 24 hours, covered loosely.
- Refrigerator: Up to 4 days, tightly covered.
- Freezer: You can freeze baked cobbler for up to 3 months. Thaw in the fridge, then reheat in the oven at 350°F until warmed through.
Avoid microwaving if you can—it makes the topping soggy. Use the oven for the best texture.
Variations You’ll Love
Here’s where you can get playful. The cherry cobbler is a canvas, and you’re the artist.

- Cherry-Peach Cobbler: Add sliced peaches for extra juiciness.
- Chocolate Cherry Cobbler: Stir in chocolate chunks into the topping.
- Gluten-Free Cherry Cobbler: Swap flour with a gluten-free blend—it works beautifully.
- Mini Cobblers: Bake in ramekins for single-serve portions.
Why This Recipe Works Every Time
Cooking isn’t about memorizing recipes—it’s about understanding why things work. This cobbler succeeds because:

- The cornstarch thickens the filling without muting cherry flavor.
- The topping uses melted butter for richness and a tender crumb.
- The balance of sweet and tart keeps it from being one-note.
It’s not luck, it’s structure. And once you get that structure down, you can riff endlessly.
The Emotional Pull of Cobbler
Food isn’t just about eating—it’s about memory. For me, cherry cobbler now reminds me of long summer nights, friends laughing in the backyard, and that moment when everyone goes quiet because dessert has arrived.

Every time you bake one, you’re creating that same memory for someone else. It’s not just fruit and flour—it’s connection.
Final Thoughts
So there you have it: a cherry cobbler that’s easy, adaptable, and soul-satisfying. In just about an hour, you can go from a bowl of cherries to a bubbling dish that smells like happiness.
If you try it once, I promise it won’t be the last. You’ll find excuses to make it again—holidays, potlucks, Tuesday nights when you need something sweet. Because once you master cobbler, you realize it’s less a recipe and more a life skill.
Now go grab those cherries and start baking. Your kitchen deserves to smell like this.